
I have always wondered how the system performs especially when thousand or even millions of users starts using it. I have now realized it’s necessary to have a fair idea of how many users your app or APIs endpoint can handle that is freshly built and how to scale over time.
It is also important to understand what types of request are successful and which are failing. To understand this we will be using a lite framework called Locust, even users who are not much familiar with Python language will be able to learn and use it.
What is Locust?
Locust is a testing framework that uses python Scripts that is scalable and widely used as a performance testing/analysis tool. It is powerful and simple to use - you define what type of users, how many and when to swarm your system.
What we plan on learning?
One of the great features of Locust is that you write all your code in Python. We’ll be writing simple test cases to understand REST API that uses JSON Web Token; simulating users in a different time interval and find some interesting results and find a way to tackle the issue.
Let’s fork one of my project Market API for testing.
Setting it up
Let’s create a virtual environment first so that we isolate the dependencies;
- mkdir locust
- cd locust && pip install virtualenv
- virtualenv venv -p python3.8 && source venv/bin/activate
- pip install locust
More info: Locust uses Flask, a light-weight Python framework to run the testing in the browser where you can view the real-time analysis visualization and even export the result after test completion.
Writing basic tests
1. Authenticaitons
Let’s create locustfile.py and write tests for different endpoints.
- touch locustfile.py credentails.py
Add the login credentails in credentails.py file.
email = 'YOUR_EMAIL_ADDRESS'
password = 'YOUR_SECRET_PASSWORD'
Next, we write some real tests inside locustfile.py file. Lets test autentications.
import time

from locust import HttpUser, task, between

from credentails import email, password


class MarketAPI(HttpUser):
    wait_time = between(0, 1.9)
    base_api_version = 'api/v1'

    def on_start(self):
        self.login()

    @task(1)
    def login(self):
        response = self.client.post(f"{self.base_api_version}/auth/token/", json={"email": email, "password": password})
        if response.json().get('errors'):
            print(response.text)
        self.access_token = response.json()['access']
        self.refresh_token = response.json()['refresh']
In the above code, we write the user login test case for token-based authentication by providing email and password. We need to include the login function inside the on_start function so that this executed first every time. As described in the official doc, When a test starts, HttpUser class will create an instance of this class for every user that it simulates, and each of these users will create a micro-thread that will call those methods.
The @task is a decorator that will wait for users between the time defined in wait_time attribute for each task - we defined to wait between 0.8 and 1.9 seconds. The task decorator is defined and run in ascending order.
Likewise, self.client makes HTTP calls to the various APIs endopint, you can use HTTP methods like GET or POST.
2. List, retrive and Post
List
Add @task(2) to list data.
@task(2)
def list_items(self):
  self.client.get(f"{self.base_api_version}/products/", headers={'Authorization': f'Bearer {self.access_token}'})
  self.client.get(f"{self.base_api_version}/products/comments/", headers={'Authorization': f'Bearer {self.access_token}'})
Retrive
Likewise, we iterate and retrieve data in one endpoint point using for loops. Similarly, we can also import Python’s time time.sleep() to stop for each retrieval process. To retrieve each product, we write @task(3).
@task(3)
def view_products(self):
    for product in range(1, 50):
        self.client.get(f"{self.base_api_version}/products/{product}/",
                            headers={'Authorization': f'Bearer {self.access_token}'})
        time.sleep(0.3)
POST
We refresh old token and generate new one.
@task(4)
def refresh_token(self):
    new_refresh_token = self.client.post(f"{self.base_api_version}/auth/token/refresh/",
                      json={"refresh": self.refresh_token},
                      headers={'Authorization': f'Bearer {self.access_token}'})
    print(new_refresh_token.text)
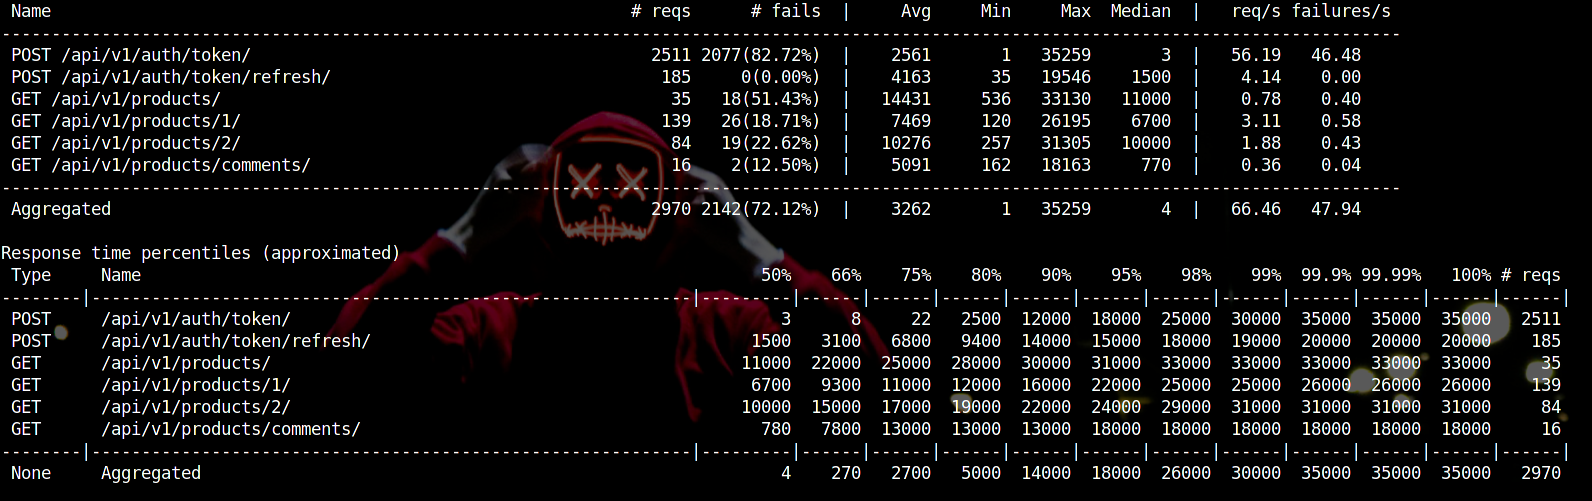
3. Result Analysis
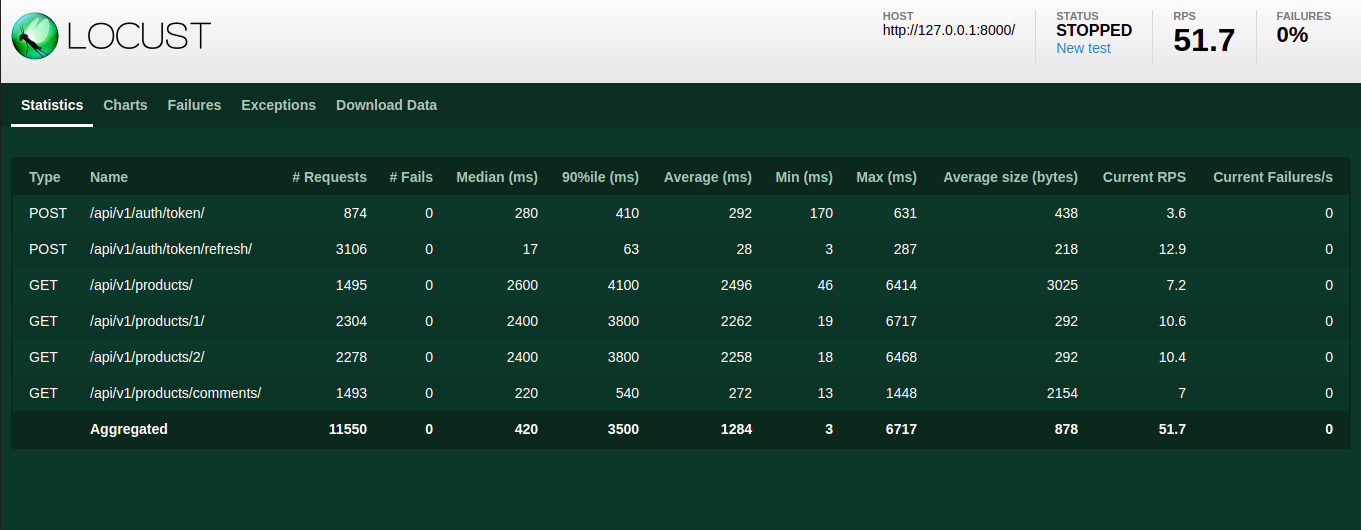
After running the test, the results are viewable in different visual means. In dashboard home, it includes the statistics like the number of requests made, failure rate, the average time taken for various endpoints.
The visualizations include;
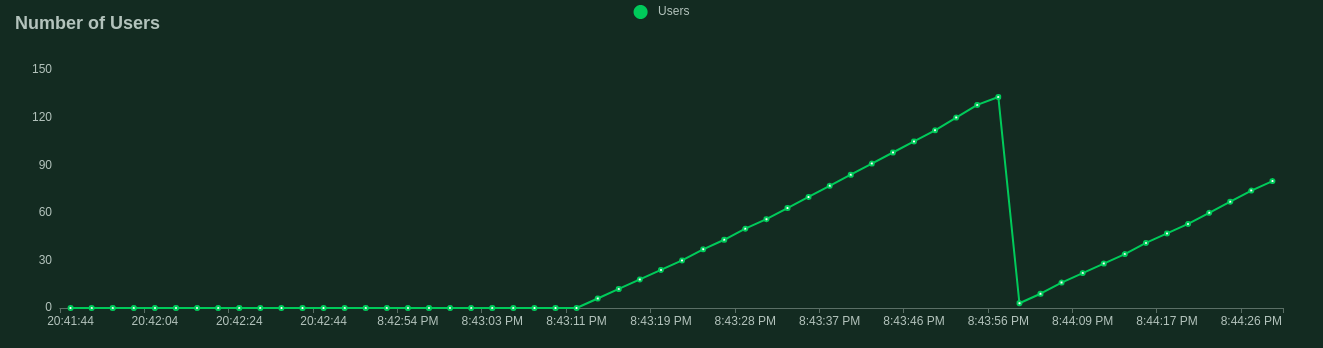
The numbers of users simulated in a different time interval and their bounce rate.
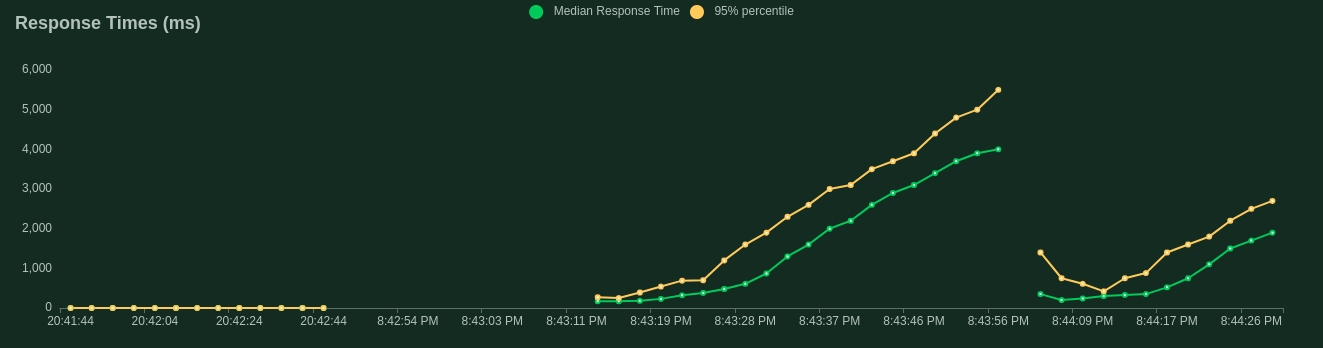
The response time in (ms) in real-time or after test completion, includes the comparison of percentage and the median time taken.
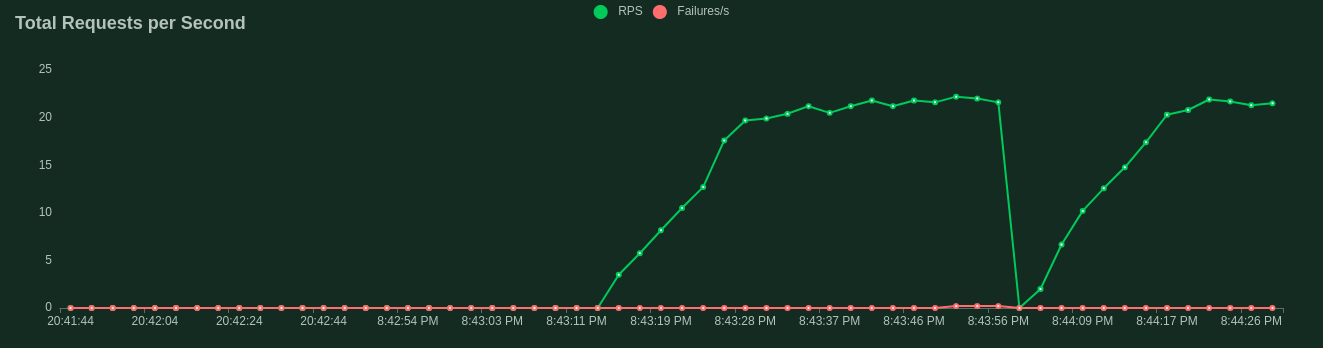
Finally, the most important - failure rate can be viewed alongside RPS (Current requests per second).
Hint: All the raw data can be also exported in a CSV file. It is very helpful when you want to keep records of performance over time.
Around 100-150 users were simulated in total to tests various endpoints in the above examples. The actual users that could use the system could easily crash a single server.
Swarming the system

Next, we simulated around 5k-7k users to use the API in total. This results - API cannot handle the majority of requests and start throttling. Moreover, even when code is optimized - CPU power will give up eventually. And we will get a warning like CPU usages is high or API cannot process too many requests.
How to fix API not able to process requests?
Load balancing with Nginx
One of the ways we can resolve the APIs slow down or frequent requests failure is to implement HTTP load balancing - we will use Nginx. This technique allows to optimize and maximizing the resource utilization while reducing latency and ensuring fault-tolerant configurations by running multiple instances of the same application as highlighted in the official documentation.
What is load balancing?
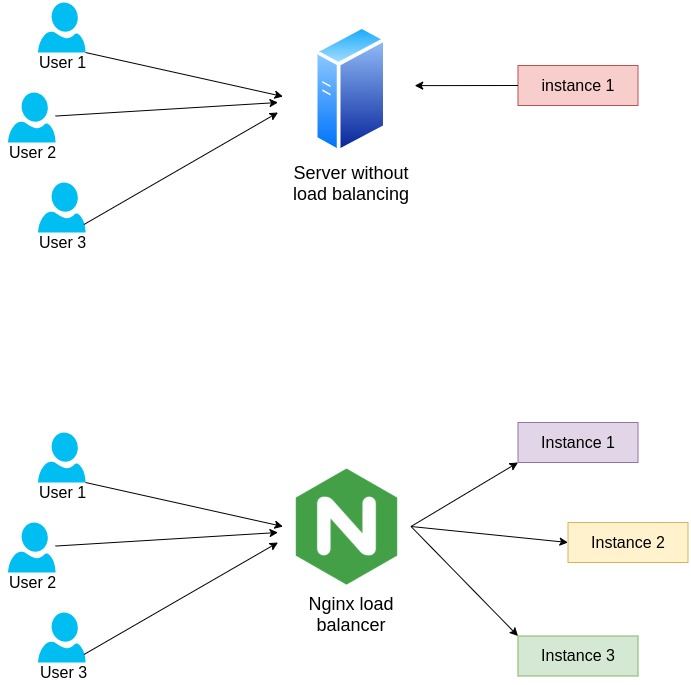
Load balancing is the process of distributing incoming traffic across a group of servers. The load balancer sits in front of servers and routs client requests across all servers which are capable of fulfilling those requests efficiently.
Writing configs
The default Nginx config files are located at /etc/nginx/sites-available/. You need to open your current active configure file that is serving the main application and include upstream and location.
http {
    upstream test_api {
        # replace localhost with instance internal IP
        server host2.localhost.com;
        server host3.localhost.com;
        server host4.localhost.com;
        server host5.localhost.com;
    }

    server {
        listen 80;

        # enable for HTTPS i.e. letsencrypt
        # listen 443 ssl;
        # ssl_certificate /etc/letsencrypt/live/DOMAIN_NAME/fullchain.pem;
        # ssl_certificate_key /etc/letsencrypt/live/DOMAIN_NAME/privkey.pem;
        # include /etc/letsencrypt/options-ssl-nginx.conf;
        # ssl_dhparam /etc/letsencrypt/ssl-dhparams.pem;

        server_name localhost.com;

        location / {
            proxy_pass http://test_api;
        }
    }
}
In the above example, we see many instances of the same application allocated with the same upstream name. Reverse proxy work in both HTTP and HTTPS alongside other protocols like Memcache.
Note: The upstream name and proxy_pass name (test_api) must be same. It is best to use the internal IP for best security and performances in the server.
The Nginx uses round-robin mechanism by default which balances the request made in each server.
 upstream myapp1 {
        least_conn; # load balancing mechanism type
        server localhost:3000;
        server localhost:5000;
        server localhost:6000;
    }
For example, the least_conn load balancing type will not try not to overload a busy application server instead distributes it to a less busy server.
 upstream myapp1 {
        server localhost:3000 max_conns=200;
        server localhost:5000 max_conns=900;
        server localhost:6000;
        queue 160 timeout=80;
    }
If one of your instances is not powerful compare to another, you can also assign max connection to that particular server using max_conns. When the max connections are reached it is placed in a queue for further processing.
Likewise, there are different supported algorithms like IP hash, Least time, Session persistence, Weighted load, Health checks that are designed to specific use cases - read more in official doc.
Final thoughts
In this guide, we learned how to load test APIs, analyse endpoints that are taking more time to load when a high volume of requests are generated. We learned serving the application using load balancing will help on solving the load time/frequent APIs crashes issues.
Here is the Locust script repository if you want to test things out.
If you have any questions or maybe alternative ways to tackle the issue, please let me know.
Leave a comment